– How to add WiFi to a multifunction printer using Raspberry Pi –
PART 4: INSTALL SCANNER SERVER
In the previous part we configured the IP address of the Raspberry Pi. In this article, instructions are given to install scanner server software SANE. Configuration makes it accessible from the local network.
28) Add saned to xinetd config, so internet daemon will listen and provide sane-daemon service:
sudo nano /etc/xinetd.d/sane-daemon
Add/Edit contents to:
service sane-port{ socket-type = stream server = /usr/sbin/saned protocol = tcp user = saned group = saned wait = no disable = no}
29) Edit sane daemon config, adding your current wlan subnet as permitted.
sudo nano /etc/sane.d/saned.conf
# Leaving only uncommented line as192.168.1.0/24
30) Add user lp to saned group
sudo adduser saned lp
31) Enable saned socket to receive and send
sudo systemctl enable saned.socket 32) Check saned socket status
sudo systemctl status saned.socket
33) Get free client software: SwingSane
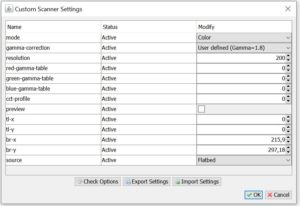
I recommend SwingSane. It is quite functional. Eve so, on Windows the custom scanning settings had to be used always to get good scanning results.
Working Swing Sane Custom Settings
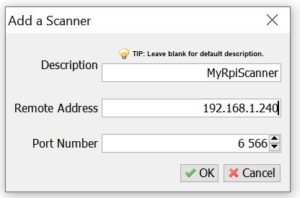
Install SwingSane to a client computer. Then, configure it by adding new scanner by IP address. In this point, you can give it any name you want. The Remote Address is the address of the Raspberry Pi, and the SANE port number is 6566.
34) Do a test scan
As a result, of the installs and configuration, you should have now a printer – scanner with a WiFi connection, that can be reached over the wireless local area network.
I didn’t make this all up by myself. Some partial instructions were helpful. Therefore, I give them credit and backlinks:
In the previous part, we configured the printer server, now we may want to set a fixed IP address, which makes configuring the scanner software easier, and also facilitates printer search too. The IP address range used by router’s DHCP should not be used for fixed addresses, but you may be able to set a fixed DHCP address for the raspberry in the router’s config, so that the DHCP always gives the same address to the device (which it reconginzes in WLAN by its MAC address).
21) Plan the place of the Raspberry Pi in your Local Area Network
Let’s think about configuring your RPi to have a fixed IP address in the WLAN. You can either program your WLAN router to always give the same IP address to the RPi:s WLAN adapter, or select an address within the subnet and out of the DHCP range in use. In this writing, we take the latter route, i.e. setting the IP address out of the DHCP range; assuming that DHCP is giving addresses starting from 192.168.1.10 and ending to 192.168.1.200, we pick an address in range 201-254, say, 192.168.1.245. This depends of course of your subnet configuration. If you have router management IP in 192.168.1.1 and the IP V4 net mask is 255.255.255.0, and you have nothing in your net with IP address 192.168.1.245, you’re good to go with my settings.
22) Configure the IP V4 address via DHCP
Configure the dhcp daemon to make the IP address a static one; consult iwconfigto get the name of your connected wlan interface. In the system configuration step, raspi-config , section Network – 2, you should have set “Enable Predictable names” to get wlan0 instead of something like wlx01234678ABCD. Now, edit dhcp configuration file:
sudo nano /etc/dhcpcd.conf
#Add to beginning:
nohook lookup-hostnameinterface wlan0 # wlan0 is the typical name for the wireless lan (wifi) interface, but it may be also longerstatic ip_address=192.168.1.245/24static routers=192.168.1.1static domain_name_servers=1.1.1.1 # of whichever DNS you want, for example, 192.168.1.1, 8.8.8.8 will also do.
Save and then restart DHCPD, or just reboot.
Now we have set fixed IP address for the Raspberry Pi. Please note that if you configured the printer in the PC using IP address, you may want to reconfigure the address now.
In the next part we will configure the scanner server.
The previous articlegave instructions how to prepare Raspberry Pi for installation of the required software, when adding WiFi to a printer. Now we proceed to installation of CUPS.
PART 2: INSTALL PRINTER SERVER WITH LAN ACCESS
11) Install printer server CUPS with a shell command:
sudo apt-get install cups
12) Configure CUPS by editing its configuration file with nano editor:
sudo nano /etc/cups/cupsd.conf
Edits:
# NOT Only listen for connections from the local machine.#Listen localhost:631#CHANGED TO LISTEN TO LOCAL LAN
Port 631# Restrict access to the server...<Location />
Order allow,deny Allow @Local</Location>
# Restrict access to the admin pages...<Location /admin>
Order allow,deny Allow @Local</Location># Restrict access to configuration files...<Location /admin/conf>
AuthType Default
Require user @SYSTEM
Order allow,deny Allow @Local</Location> 13)
Restart CUPS service to make the new configuration effective
sudo service cups restart
14) Add user pi to group lpadmin
To make administration easier, to work with the default user pi, itcan be added to lpadmin (Line Printer Administrator) group:
16) Test that you can access CUPS via your wireless LAN
If everything went OK, CUPS should be visible from other computers in your LAN. Try it by opening a browser, to the address the raspberry pi has in your lan, with the port 631. You can find the IP address of the RPi with the command:
hostname -I
If the ip address were 192.168.1.33 , then the URL to get to the CUPS page is for example: http://192.168.1.33:631
17) Install Samba
Samba is necessary if you are about to use the printer/scanner/RPi in association with Windows clients.
sudo apt-get install samba
When asked “Modify smb.conf to use WINS settings from DHCP?” answer YES
Edit config further:
sudo nano /etc/samba/smb.conf
in section [printers], change:guest ok = yesread only = no
18) Connect the printer via USB
See that your printer is connected to Raspberry Pi’s USB via USB hub (or directly but then you must use a Bluetooth keyboard or SSH to talk to your RPi if there’s no room for an USB keyboard)
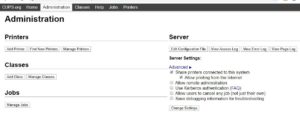
19) Add Printer in CUPS configuration page
Go to the CUPS page, Administration tab and “Add Printer”. The browser is sure to complain about security, but in this case you can go ahead. Page is (in condition that the RasPi is has address 192.168.1.33):
Login with user pi and its password. If you see warnings, they come because the RasPi does not have SSH certificates in order. You’re good to go ahead to your admin page to accomplish what you’re doing.
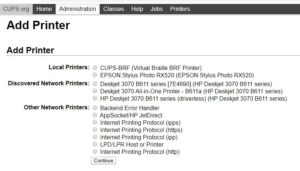
You should see your connected printer there if it is supported by CUPS out-of-the-box. Most HP and many Epson should be. Remember to set Share this printer
20) Configure the printer
On the CUPS page, select your printer and configure it.
What could go wrong? 😉
Add the printer to your client machine as network printer. On Windows 10, you can add it from Settings > Add printer or scanner, and select the printer from the list where it appears.
If that fails, go to Control Panel > Printers and devices > Add printer . Select The printer I that I want isn’t listed option, then Add a printer using a TCP/IP address or hostname.
In the next part, we’ll look in to how to set the Raspberry Pi a fixed IP address, which makes it more accessible in your local network.
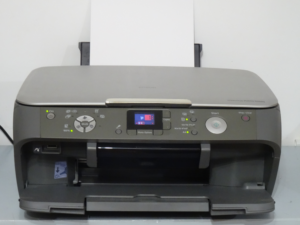
Dear reader, I got a good but old photo-quality printer, but it was missing wireless connectivity. Even if its tradeable value is around 50 euros, it still works very well. I also avoid generation of unnecessary waste, so you might think this a “greenish” project, as a no new printer needs to be produced in China and hauled to Europe. Now, add wifi to printer!
Epson RX 520 printer scanner device
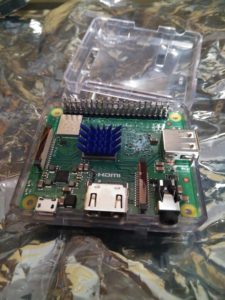
The raspberry Pi came to rescue, bought it from Amazon for about 22 euros and 4 euros for the case. Despite being an economical option, I’m glad that the original Raspberry Pi’s are made in Sheffield, England, which still qualifies to geographical Europe.
The fast but small Raspberry Pi 3 A+
This is a recipe how to make a wireless (WLAN/WiFi) printer and scanner from a plain USB printer/scanner. To accomplish this, a Raspberry Pi with Raspbian Linux and free server software cups and sane are used.
It’s is updated, completed and checked for Raspbian buster operating system, I have collected information from many sources as there were no single, updated source to accomplish my mission to equip a USB printer with WiFi. This is important, it saves a good printer to go prematurely to waste! You may save a tree, as you reduce the of use nonrenewable resources! Especially, if you don’t give up printing, use of computer, buying a Raspberry pi…. 😀
The journey is lenghtly, so prepare to spend a few hours with this! I’ve split the story to four parts. Easy? Yes, if you can already do something with Raspberry shell. In other words, this is for those who are past the first beginner steps, and can work with a command line. For people who see this difficult or troublesome I’d be happy to make and sell these for… say for 90 €. Hence, when you get a new printer for 90€, the project is not commercially very attractive, better to think it in DIY basis.
PART 1: PREPARE A RASPBERRY PI
Obviously, a Raspberry Pi is needed. I tried it first with a Raspberry Pi [1] B+ v1.2, the old one from 2014, but it’s sluggish on large prints and scans, so I ordered a Raspberry Pi 3 A+, which has sufficient connectivity for this application and besides, is cheap (I paid 22 € on Amazon.es).
The USB charger can be almost any that can supply real 5 V / 2.4 A of current, but I got some low voltage warnings with an insufficient cable.
If you only have a RasPi without wifi, you can use many old adapters. While two decades ago, Linux WiFi compatibility was a nightmare, it no longer is. In my stocks of old junk, I found a Linksys WUSB54GV4 “Wireless-G” WiFi adapter which is no longer detected by Windows 10 but works perfectly with Linux!
1) Hardware list
This is what I had, you may consider it a recommendation but no obligation.
Raspberry Pi 3 A+ (other models would do as well), costs about 25 €.
A case for the Raspberry Pi, with slots for power and USB cable. 4 – 10 €. You may use even a cardboard box.
Phone usb Power supply 2.4 A with a good microUSB cable. Less than 10 €.
4 GB microSD card (I had a 8 GB, no problem), Less than 10 €.
A USB printer-scanner, model supported by SANE: Epson Stylus Photo RX520 (Printer has to be supported by the CUPS) (List of SANE supported scanners here: http://www.sane-project.org/sane-mfgs.html)
The acessories required to configure the conveniently the Raspberry Pi:
Display with a HDMI input, You should have one already…
HDMI cable or cable with HDMI adapter -> to the display type. Came with the monitor, didn’t it?
USB keyboard (I had a Logitech K400+). Any USB keyboard will do.
Optionally, a USB hub to if you want to connect the keyboard and the printer same time to a Raspberry Pi with one USB port same time. 10 €
At the moment, I don’t advertise or have affiliations for now (also thanks to the old-fashioned Spanish taxation system for extra income). To give a glue, where I have got the items: I often buy used stuff from CashConverteres, CeX or Ebay. You can get a new parts like Raspberry Pi and the SD card from kubii.fr, amazon.es or even Carrefour or Alcampo.
2) Download a free operating system for the Raspberry Pi
Plug in the microSD Card, connect a display via HDMI and a keyboard via USB.
Hint: there are HDMI to DVI-D and HDMI to VGA adapters to make use of old display units.
5) Add Wifi adapter if Raspberry Pi does not contain it
On a Rasberry Pi 1 type boards and some others, there is no WiFi adapter. In that case, plug in a supported WiFi adapter to a USB port.
6) Connect power
Power with 2 amp phone charger with microUSB connector.
7) Booting
Raspberry Pi should boot and you get the usual dump on your display.
8) Login from local console
Use the keyboard and display connected to the Raspberry Pi.
Login: pi Password: raspberry
These are the login and passsword after fresh installation.
9) Make first fundamental configurations to RasPi.
Configure the RPi with
sudo raspi-config
in 4) Localization options to get the right keyboard layout (Default is US keyboard)
At Network Options N1 you may want to give the print server a name
You must setup WiFi network connection in Network Options N2, This way you can connect to your WLAN
in Network Options N3 you may want to set also predictable interface names. As a result, you’ll get network interface names like wlan0.
in Interfacing Options you may want to enable SSH access (if you don’t have an extra display or USB HUB, you’ll want to connect from your computer with e,g, PuTTY) . If you enable SSH, you should change the password for the default user pi with the command passwd
Finish raspi-config and reboot
10) Update the operating system and included software
First get updates, remember you need the wlan connection. Reboot to take the updates to use