The previous article gave instructions how to prepare Raspberry Pi for installation of the required software, when adding WiFi to a printer. Now we proceed to installation of CUPS.
PART 2: INSTALL PRINTER SERVER WITH LAN ACCESS
11) Install printer server CUPS with a shell command:
sudo apt-get install cups
12) Configure CUPS by editing its configuration file with nano editor:
sudo nano /etc/cups/cupsd.conf
Edits:
# NOT Only listen for connections from the local machine.
#Listen localhost:631 #CHANGED TO LISTEN TO LOCAL LAN
Port 631
# Restrict access to the server...
<Location />
  Order allow,deny
  Allow @Local </Location>
# Restrict access to the admin pages...
<Location /admin>
  Order allow,deny
  Allow @Local
</Location>
# Restrict access to configuration files...
<Location /admin/conf>
  AuthType Default
  Require user @SYSTEM
  Order allow,deny
  Allow @Local
</Location> 13)
Restart CUPS service to make the new configuration effective
sudo service cups restart
14) Add user pi to group lpadmin
To make administration easier, to work with the default user pi, it can be added to lpadmin (Line Printer Administrator) group:
sudo usermod -a -G lpadmin pi
15) Allow access to cups from network:
sudo cupsctl --remote-any
sudo /etc/init.d/cups restart
16) Test that you can access CUPS via your wireless LAN
If everything went OK, CUPS should be visible from other computers in your LAN. Try it by opening a browser, to the address the raspberry pi has in your lan, with the port 631. You can find the IP address of the RPi with the command:
hostname -I
If the ip address were 192.168.1.33 , then the URL to get to the CUPS page is for example: http://192.168.1.33:631
17) Install Samba
Samba is necessary if you are about to use the printer/scanner/RPi in association with Windows clients.
sudo apt-get install samba
When asked “Modify smb.conf to use WINS settings from DHCP?” answer YES
Edit config further:
sudo nano /etc/samba/smb.conf
in section [printers], change:

guest ok = yes
read only = no
18) Connect the printer via USB
See that your printer is connected to Raspberry Pi’s USB via USB hub (or directly but then you must use a Bluetooth keyboard or SSH to talk to your RPi if there’s no room for an USB keyboard)
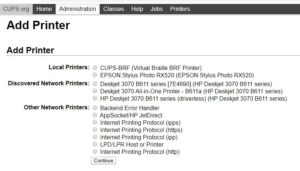
19) Add Printer in CUPS configuration page
Go to the CUPS page, Administration tab and “Add Printer”. The browser is sure to complain about security, but in this case you can go ahead. Page is (in condition that the RasPi is has address 192.168.1.33):
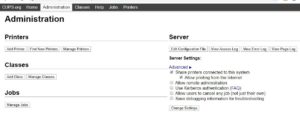
Login with user pi and its password. If you see warnings, they come because the RasPi does not have SSH certificates in order. You’re good to go ahead to your admin page to accomplish what you’re doing.
You should see your connected printer there if it is supported by CUPS out-of-the-box. Most HP and many Epson should be. Remember to set Share this printer
20) Configure the printer
On the CUPS page, select your printer and configure it.
What could go wrong? 😉
Add the printer to your client machine as network printer. On Windows 10, you can add it from Settings > Add printer or scanner, and select the printer from the list where it appears.
If that fails, go to Control Panel > Printers and devices > Add printer . Select The printer I that I want isn’t listed option, then Add a printer using a TCP/IP address or hostname.
In the next part, we’ll look in to how to set the Raspberry Pi a fixed IP address, which makes it more accessible in your local network.
Logged in as {{omniform_current_user_display_name}}. Edit your profile. Log out? Required fields are marked *
Your email address will not be published. Required fields are marked *
Comments are closed.
You must be logged in to post a comment.