– How to add WiFi to a multifunction printer using Raspberry Pi –
PART 4: INSTALL SCANNER SERVER
In the previous part we configured the IP address of the Raspberry Pi. In this article, instructions are given to install scanner server software SANE. Configuration makes it accessible from the local network.
23) Install internet daemon xinetd
sudo apt-get install xinetd
As a result, your has the better intenet daemon, which makes managing sevices provided via sockets easier.
24) Install Scanner server software SANE… with some utilities
sudo apt-get install sane-utils
The package contains sane utilities including saned SANE daemon.
25) Installing scanner server requires to add / edit new udev rule for scanner, to enable access:
sudo nano /etc/udev/rules.d/65-libsane.rulesprinter
contents of the new rule line:
ACTION==”add”, ENV{DEVTYPE}==”usb_device”, ENV{libsane_matched}==”yes”, RUN+=”/bin/setfacl -m g:scanner:rw $env{DEVNAME}”
26) find path of saned
which saned
Presuming, it is /usr/sbin/saned , as it shoud be with Raspbian Buster Lite
27) Check that saned is added to services
sudo cat /etc/services | grep sane
EXPECTED OUTPUT:
sane-port 6566/tcp sane saned # SANE network scanner daemon
28) Add saned to xinetd config, so internet daemon will listen and provide sane-daemon service:
sudo nano /etc/xinetd.d/sane-daemon
Add/Edit contents to:
service sane-port
{
  socket-type = stream
  server = /usr/sbin/saned
  protocol = tcp
  user = saned
  group = saned
  wait = no
  disable = no
}
29) Edit sane daemon config, adding your current wlan subnet as permitted.
sudo nano /etc/sane.d/saned.conf
# Leaving only uncommented line as
192.168.1.0/24
30) Add user lp to saned group
sudo adduser saned lp
31) Enable saned socket to receive and send
sudo systemctl enable saned.socket
32) Check saned socket status
sudo systemctl status saned.socket
33) Get free client software: SwingSane
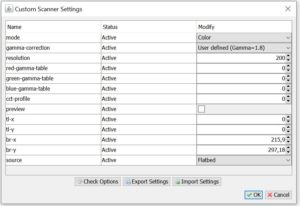
I recommend SwingSane. It is quite functional. Eve so, on Windows the custom scanning settings had to be used always to get good scanning results.

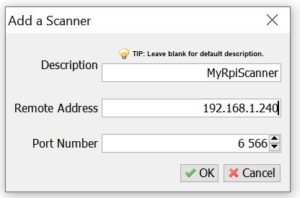
Install SwingSane to a client computer. Then, configure it by adding new scanner by IP address. In this point, you can give it any name you want. The Remote Address is the address of the Raspberry Pi, and the SANE port number is 6566.

34) Do a test scan
As a result, of the installs and configuration, you should have now a printer – scanner with a WiFi connection, that can be reached over the wireless local area network.
I didn’t make this all up by myself. Some partial instructions were helpful. Therefore, I give them credit and backlinks: