Part 4, Install Scanner Server

– How to add WiFi to a multifunction printer using Raspberry Pi –

PART 4: INSTALL SCANNER SERVER

In the previous part we configured the IP address of the Raspberry Pi. In this article, instructions are given to install scanner server software SANE. Configuration makes it accessible from the local network.

23) Install internet daemon xinetd

sudo apt-get install xinetd

As a result, your has the better intenet daemon, which makes managing sevices provided via sockets easier.

24) Install Scanner server software SANEwith some utilities

sudo apt-get install sane-utils

The package contains sane utilities including saned SANE daemon.

25) Installing scanner server requires to add / edit new udev rule for scanner, to enable access:

sudo nano /etc/udev/rules.d/65-libsane.rulesprinter

contents of the new rule line:

ACTION==”add”, ENV{DEVTYPE}==”usb_device”, ENV{libsane_matched}==”yes”, RUN+=”/bin/setfacl -m g:scanner:rw $env{DEVNAME}”

26) find path of saned

which saned

Presuming, it is /usr/sbin/saned , as it shoud be with Raspbian Buster Lite

27) Check that saned is added to services

sudo cat /etc/services | grep sane

EXPECTED OUTPUT:

sane-port 6566/tcp sane saned  # SANE network scanner daemon

28) Add saned to xinetd config, so internet daemon will listen and provide sane-daemon service:

sudo nano /etc/xinetd.d/sane-daemon

Add/Edit contents to:

service sane-port
{
  socket-type = stream
  server = /usr/sbin/saned
  protocol = tcp
  user = saned
  group = saned
  wait = no
  disable = no
}

29) Edit sane daemon config, adding your current wlan subnet as permitted.

sudo nano /etc/sane.d/saned.conf 
# Leaving only uncommented line as
192.168.1.0/24

30) Add user lp to saned group 

sudo adduser saned lp

31) Enable saned socket to receive and send

sudo systemctl enable saned.socket
32) Check saned socket status

sudo systemctl status saned.socket

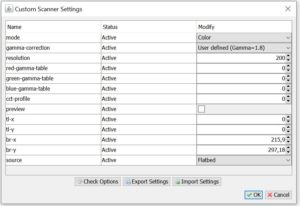
33) Get free client software: SwingSane

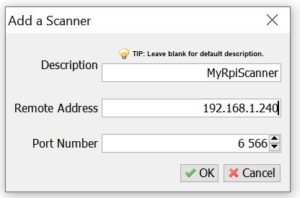
I recommend SwingSane. It is quite functional. Eve so, on Windows the custom scanning settings had to be used always to get good scanning results.

Color mode and resolution 200 (dpi), br-x 215, br-y 297
Working Swing Sane Custom Settings

Install SwingSane to a client computer. Then, configure it by adding new scanner by IP address. In this point, you can give it any name you want. The Remote Address is the address of the Raspberry Pi, and the SANE port number is 6566. 

34) Do a test scan

As a result, of the installs and configuration, you should have now a printer – scanner with a WiFi connection, that can be reached over the wireless local area network.

I didn’t make this all up by myself. Some partial instructions were helpful. Therefore, I give them credit and backlinks:

How to add WiFi to a multifunction printer with USB using Raspberry Pi – Part 3, Set Fixed IP Address

PART 3: SET FIXED IP ADDRESS

In the previous part, we configured the printer server, now we may want to set a fixed IP address, which makes configuring the scanner software easier, and also facilitates printer search too. The IP address range used by router’s DHCP should not be used for fixed addresses, but you may be able to set a fixed DHCP address for the raspberry in the router’s config, so that the DHCP always gives the same address to the device (which it reconginzes in WLAN by its MAC address).

21) Plan the place of the Raspberry Pi in your Local Area Network

Let’s think about configuring your RPi to have a fixed IP address in the WLAN. You can either program your WLAN router to always give the same IP address to the RPi:s WLAN adapter, or select an address within the subnet and out of the DHCP range in use. In this writing, we take the latter route, i.e. setting the IP address out of the DHCP range; assuming that DHCP is giving addresses starting from 192.168.1.10 and ending to 192.168.1.200, we pick an address in range 201-254, say, 192.168.1.245. This depends of course of your subnet configuration. If you have router management IP in 192.168.1.1 and the IP V4 net mask is 255.255.255.0, and you have nothing in your net with IP address 192.168.1.245, you’re good to go with my settings.

22) Configure the IP V4 address via DHCP

Configure the dhcp daemon to make the IP address a static one; consult iwconfig to get the name of your connected wlan interface. In the system configuration step, raspi-config , section Network – 2, you should have  set “Enable Predictable names” to get wlan0 instead of something like wlx01234678ABCD. Now, edit dhcp configuration file:

sudo nano /etc/dhcpcd.conf

#Add to beginning:

nohook lookup-hostname
interface wlan0 # wlan0 is the typical name for the wireless lan (wifi) interface, but it may be also longer
static ip_address=192.168.1.245/24
static routers=192.168.1.1
static domain_name_servers=1.1.1.1 # of whichever DNS you want, for example, 192.168.1.1, 8.8.8.8 will also do.

Save and then restart DHCPD, or just reboot.

Now we have set fixed IP address for the Raspberry Pi. Please note that if you configured the printer in the PC using IP address, you may want to reconfigure the address now.

In the next part we will configure the scanner server.

How to add WiFi to a multifunction printer using Raspberry Pi – Part 2

The previous article gave instructions how to prepare Raspberry Pi for installation of the required software, when adding WiFi to a printer. Now we proceed to installation of CUPS.

PART 2: INSTALL PRINTER SERVER WITH LAN ACCESS

11) Install printer server CUPS with a shell command:

sudo apt-get install cups

12) Configure CUPS by editing its configuration file with nano editor:

sudo nano /etc/cups/cupsd.conf

Edits:

# NOT Only listen for connections from the local machine. 
#Listen localhost:631 #CHANGED TO LISTEN TO LOCAL LAN 
Port 631 
# Restrict access to the server... 
<Location />   
  Order allow,deny   
  Allow @Local </Location>  
# Restrict access to the admin pages... 
<Location /admin>   
  Order allow,deny   
  Allow @Local 
</Location> 
# Restrict access to configuration files... 
<Location /admin/conf>   
  AuthType Default   
  Require user @SYSTEM   
  Order allow,deny   
  Allow @Local 
</Location> 13)

Restart CUPS service to make the new configuration effective

sudo service cups restart

14) Add user pi to group lpadmin

To make administration easier, to work with the default user pi, it can be added to lpadmin (Line Printer Administrator) group:

sudo usermod -a -G lpadmin pi

15) Allow access to cups from network:

sudo cupsctl --remote-any
sudo /etc/init.d/cups restart

16) Test that you can access CUPS via your wireless LAN

If everything went OK, CUPS should be visible from other computers in your LAN. Try it by opening a browser, to the address the raspberry pi has in your lan, with the port 631. You can find the IP address of the RPi with the command:

hostname -I

If the ip address were 192.168.1.33 , then the URL to get to the CUPS page is for example: http://192.168.1.33:631 

17) Install Samba

Samba is necessary if you are about to use the printer/scanner/RPi in association with Windows clients. 

sudo apt-get install samba

When asked “Modify smb.conf to use WINS settings from DHCP?” answer YES

Edit config further:

sudo nano /etc/samba/smb.conf
in section [printers], change:

guest ok = yes
read only = no

18) Connect the printer via USB

See that your printer is connected to Raspberry Pi’s USB via USB hub (or directly but then you must use a Bluetooth keyboard or SSH to talk to your RPi if there’s no room for an USB keyboard)

19) Add Printer in CUPS configuration page

Go to the CUPS page, Administration tab and “Add Printer”. The browser is sure to complain about security, but in this case you can go ahead. Page is (in condition that the RasPi is has address 192.168.1.33):

https://192.168.1.33:631/admin/

Login with user pi and its password. If you see warnings, they come because the RasPi does not have SSH certificates in order. You’re good to go ahead to your admin page to accomplish what you’re doing.

You should see your connected printer there if it is supported by CUPS out-of-the-box. Most HP and many Epson should be. Remember to set Share this printer

20) Configure the printer

On the CUPS page, select your printer and configure it.

What could go wrong? 😉

Add the printer to your client machine as network printer. On Windows 10, you can add it from Settings > Add printer or scanner, and select the printer from the list where it appears.

If that fails, go to Control Panel > Printers and devices > Add printer . Select The printer I that I want isn’t listed option, then Add a printer using a TCP/IP address or hostname.

In the next part, we’ll look in to how to set the Raspberry Pi a fixed IP address, which makes it more accessible in your local network.